Blackbox Mastering Wiki
Blackbox is an analog style mastering chain with sophisticated automation to give clarity, loudness, warmth and punch to music. Blackbox uses expressive controls which allow the user to make a suggestion on how they want their audio to sound rather than having to know the intricacies of an audio mastering chain. Blackbox DSP modules simulate mastering hardware and its internal devices loosely emulate classic mastering gear like the MLA-3 and MBP II. The combining these expressive controls with content aware AI, Blackbox is able to finely tune its mastering chain to the audio content to get the most out of the sound.
Quick Start
Windows - download the zip file and extract the binary executable. Put the executable file where you desire and create a shortcut to it if you wish. The Blackbox.exe is standalone so should just run from any location.
Mac - download the dmg file and extract the binary application. Put the application in the applications folder on your mac. Run the application. If you get a security warning saying it can't be run as settings only allow applications from Mac App Store, don't worry. Go to Apple -> System Preferences -> Security & Privacy and you should see a notification about "BlackBox was blocked", click on "Open Anyway" which should allow the program to run!
Once setup you can drag and drop audio directly to the interface or use the browse icon in the top right hand corner. After selecting the audio file you wish to process you can either process a small section of the track by highlighting and clicking process or you can process the entire track. There are some presets available to select from to aid you getting the desired sound.
Keyboard Shortcuts
There are several keyboard shortcuts in Blackbox which include:
- L - selects / highlights the area that has already been processed for quick listening
- UP - sets playback to source audio to assist A and B switching
- DOWN - sets playback to target audio to assist A and B switching
- P - try and process either the selected audio or the entire track
- S - save the processed audio
Controls

Blackbox box uses 8 crafted expressive controls to achieve desired outcomes. It's useful to know the scope of each of these controls and how they affect the signal.
Low Frequency Cut
The LFC, low frequency cut is a digital brickwall style filter that happens early on in the mastering chain. It is responsible for clearing out the rumble within a mix and gives a cleaner signal to the rest of the chain. Be careful not to go too high depending on your audio source as some fundemental frequencies often reside as low as 50hz. As a general rule you want to clean between 28hz and 44hz (this is slightly subjective).
Sub Enhance
The sub enhancer control affects several elements of the sub bass. It is primeraly a gain control but it also serves as a multiplier for bass part of the multiband compressor and as a tuner control for the sub decimator which focuses the fundemental bass frequencies.
Body Level
The body level plays a similair role to the sub enhancer and focuses on the first set of harmonics. This is a useful control and in general should be used in the opposite direction as the sub enhancer. If you want a focused sub bass for loud club speakers then it is recommended that you lower the body level to create more room for sub frequencies. If however you are mixing for CD, Radio and smaller playback devices then it is recommended turning this control up whilst lowering the sub so the bass is more prominent.
Clarity
The clarity control is dictated by the content of the audio. If there is a singer or and instrument like a guitar or maybe some plucky synths that are low in the mix and you want to bring them out then you can bring the clarity up a little. If they are to prominent and you want to push them back or maybe bring out some more stringy or brassy sounds then you may want to turn the control down a little.
Brightness
The brightness control does what it says on the tin and brightens the whole mix. The upper frequencies will get pushed into the saturator and tamed a little by a compressor so its often required to bring the brightness down a little if a track has been produced digitally. If on the other hand you want the mix to have a more crispy air frequency you can push the control quite hard as it maintains perfect phase and shouldnt cause any more siblance than what is already present in the mixdown. This control can also be use creatively as it acts a little bit like a tuned shelf eq, turning it quite far down will give a warm vintage feel to the mix.
Loudness
This is how much the sound is driven into the DSPs within blackbox. It is important to understand the loudness clarity trade off when you really push this setting however, Blackbox has some nifty algorythms for maintaining transients even when pushed hard. So if you like it loud and crunchy then crank the loudness setting up.
Compression
There are many tuned compressors in Blackbox and it is one of the reasons why the mixdowns are well balanced. The compressor control will lerp between a range of subtle settings to give more or less glue to the mixdown. The compressors settings should all auto adjust to compensate for the different compression ratios and keep the overall presence the same whilst creating room for elements to shine.
Quality
Quality is directly related to the quality of the filters used by blackbox and the time it takes to render audio. Quality ranges from Fast, Low, Medium, High and Best. For context it takes approximately 16 times longer to render audio on the highest setting. It is recommended that you test with medium and then set it to high to render a 44.1 khz track. If you plan on using higher sample rates e.g. 96khz then it is highly recommended you use the Best setting as the low end may suffer on lower quality settings at these sample rates.
Other Controls
There are several other controls in Blackbox that help fine tune the output. These include
- Ceiling Control
- Loudness Release
- Stereo Cut Frequency
Ceiling Control
The ceiling control dictates the maximum peak value in decibels and can be used to conform to whatever standard is required for your production. There is also a true peak control which conforms to BS.1770 standard. Note that true peak may considerably reduce the volume of the track depending on its content. This prevents any analog system playing the signal above unity.
Loudness Release
The loudness release control is in the settings screen. This a hyper parameter that affects the limiters in blackbox. Reducing this control will create a more agressive modern limiting profile and increasing this will produce a smoother mix.
Stereo Cut Frequency
The stereo cut frequency control is in the settings screen. This a hyper parameter that affects mid side processing in blackbox. In most cases it is a good idea to centralise the bass. This frequency dictates the center of the role off frequency where you want the bass to become more mono. In some cases you may wish to leave more stereo field on the bass so reducing this frequency down to its lowest setting will achieve this.
Metering
FFT Analyser
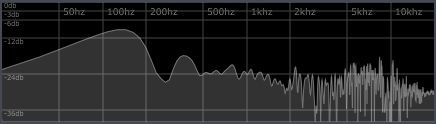
Blackbox now features a Fast Fourier Transform Analyser window in Real Time Mode. The FFT has has been augmented to show perceived sonic levels in each frequency band.
Loudness Metering

Blackbox features professional broadcast metering. You can now monitor levels in RMS, LUFS, Integrated Loudness and Dynamic Range.
- Root Mean Square (RMS) measures the average power of the signal in decibels at any moment in time.
- Loudness Unit (LUFS) is a short term loudness unit which shows the overal perceived loudness at different parts of a track.
- Integrated Loundness (INT) shows the percieved loudness across the entirety of the track.
- Dynamic Range (RNG) shows the percieved range in dynamics in decibels at any momemnt id time.
Exporting
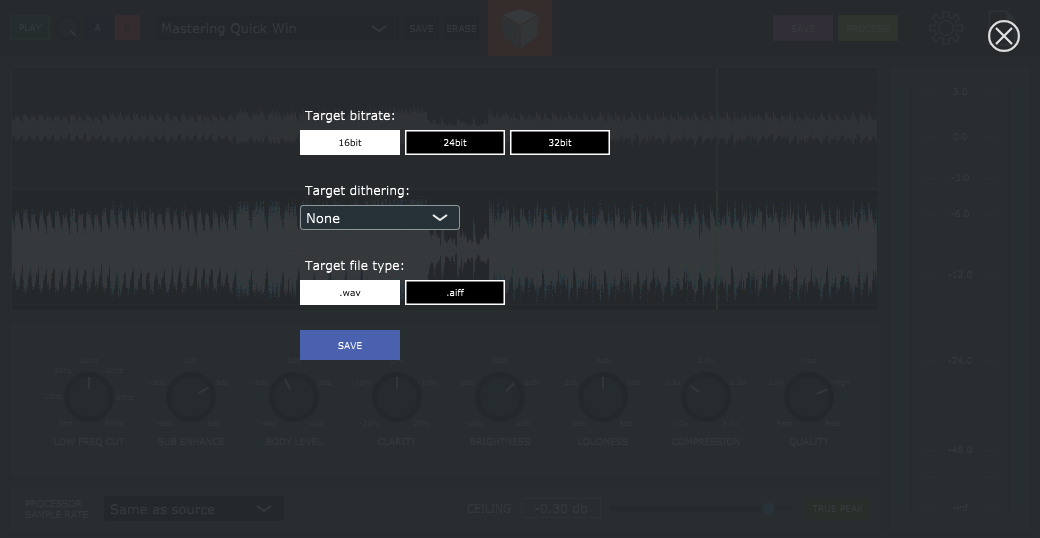
Blackbox export options allow you to save to AIFF and WAV formats at whatever processed sample rate you pick. If you choose to export to 16bit or 24bit you can addtionally add dithering signal which reduces aliasing / banding in the bit rate domain and thus smoothes out potential artifacts. Dithering has several options, None, Rectangular, Triangular and POW-r2 which dictate what kind of signal is applied. Once you have selected the appropriate options just click save and a window will appear prompting you for a file name. The extension will be added automatically. Once selected the save operation will start and in most cases will take under 10 seconds to complete.